Software for printing labels and stickers; imports image data and user can set background color.
The rich text file with a picture created using TextEdit, Microsoft Word and OpenOffice.org document can be used as a manuscript.
It will become a colorful label if a background picture and a background color are set up.
API as NSArchiver was used by the old version of this application in the file as which an extension defines the label shape of lprn. The thing by which this API is eliminated from macOS10.13 is announced. NSKeyedArchiver is used instead of NSArchiver in version 10.13 of this application. When reading, both API is used to answer to the file as which the made label shape is defined with the old version. When reading in the present, I'm moving, but it'll be predicted that it isn't possible to read any more in the future. When preserving it again, it's written in in new API, so while a reading fact can be done, I'll recommend to preserve it again.
For macOS 10.13 binary
![]()
LabelsForRTFDLabeler
Since the produced label setting database is beforehand stored in sample, please use.
One piece of manuscript of a label is drawn up from a text window.
Selection of a main menu "File" and "New" command will display an empty window.
If a file open dialog is displayed and a file is chosen in order to read files, such as RTFD, if the command "File""Open" is chosen, the contents of the file will be displayed.
It is also possible to read an file exported to "Rich Text Format...". with Pages 6.1 by Apple.
The text view in a window can arrange a text by the almost same operation as text editing of OS standard equipment. It is the edit mode of Rich Text Document with Attachments(RTFD) data.
In order to embellish a text, various kinds of menus are prepared. The "Font" and the "Text" in a main menu "Tool" are those menus.
It isn't possible to edit the "mathematical equations" made with Pages 6.1 by Apple.
There are some methods in positioning of a text.
The character string of one line of only a space character is inserted, and the font size of the space character is adjusted.
It adjusts using a "Font" and a "Baseline".
It adjusts using the Center, Align Right , etc. of a "Text".
It adjusts using a "Font" and "Kern".
Since this "NSTextView" is not a view made for the layout, there is also a place which is hard to use. There is also the method of embedding the PDF data made from the software for a layout by the drug of a file icon.
If the drug of the paste and the graphics file icon of image data is carried out, the picture will be embedded into a text.
There is no function resized so that a picture and font size may be dedicated into a frame. It is necessary to prepare size so that it may be beforehand settled into a frame using other applications about a picture.
An image format which standard API of Mac OS X supports is dealt with.
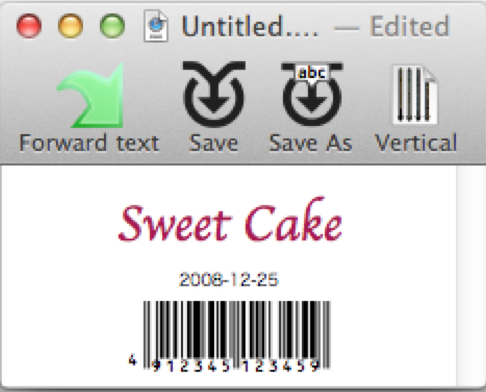
A click of the button of a tool bar "Forward text" will transmit the contents of a text and the picture to each top of a preview window.
If a text and a picture are transmitted to a preview window, it will be in the state where a print is made.Main menu "Print label" and "Print a page..." command is chosen, and a paper is set and printed.
When some manuscripts are chosen with a mouse drug, only the data of the selected portion is transmitted to each top.
When not chosen, all the data in a text view is transmitted.
The text edited when "Save" button of the tool bar was clicked is saved at a file. The dialog for saving by a file name different from the time of reading, when the "Save As" button was clicked is called.
A "Background" picture can be set up and a picture can be transmitted to each top.

Selection of a main menu "Tool""Background..." command will display the window for a background image setup.
A picture is arranged to the back of the data of each top transmitted by the command "Forward text".
A label print is made even when only a background image is transmitted.
The numerical value currently written to the size description appended to the commercial label sheet is specified, respectively.
When the "Label form" window is not displayed, main menu "Tool" and "Label form…" command is chosen.
It clicks "Save As" from a tool bar, a file name is set up, and it once saves with the original setup.
A "Label name" is determined.
"Set" button determines paper size. When a borderless form is chosen, a printer driver expands optionally in case of a print, so all except for a borderless form is chosen.

"Columns" is the horizontal number of division. "Rows" is the vertical number of division.
The size of the unfilled space of the upper left corner of a paper(mm unit).
One piece of size(mm unit).
The size which added the crevice in every piece to one piece of size(mm unit).
The size of the unfilled space of the corner of one piece of inside(mm unit).
click "Set" button.When the set-up value has inconsistency, it is adjusted to the above-mentioned priority.
Although autosave of the set-up value is carried out, a version will be decided if it clicks "Save" of a tool bar.
It takes as an example of the case of Canon MG7130,MG6530,MG6330,MG5430,iP7230(Tray Type J) and it explains.

It clicks "Save As" from a tool bar, a file name is set up, and it once saves with the original setup.
A "Label name" is determined.
"Set" button of size is clicked.
If page setting dialog is displayed, "Applicable printer" is assumed to be MG7130..., and "Size of the form" is assumed to be "CD-R tray J".
"OK" When the button is clicked, the size of the form is set to 130.00mm x 226.83mm.
Both "Columns" and "Rows" It is assumed 1.
A piece size is assumed to be 130.00mm x 130.00mm.
The size of the upper corner of the form is assumed to be a value in which the half of piece height is pulled from 120.0mm in length from this side of the CD-R tray to the center of CD-R. That is, 120.0 - 0.5 x 130.00 = 55.0mm.
The size of the blank in the left corner of the form is assumed to be 0.00mm.
The size in which a space each piece is added to a piece size is assumed to be same 130.00mm x 130.00mm as a piece size.
This comes to be displayed as a default value if it opens again after the set value is preserved though assumes the size of the blank in the corner in a piece to be 6.97mm x 6.97mm.
"CD/DVD" The check is put in the check box and it keeps effective.
"Set" button is clicked.
When printing, the value of print dialog "Fineness and kind of the form" and "Kind of the form" is assumed to be "Printable disk". If "Print" button is clicked, the printer driver displays the manner of operation thereafter.
A label print calls the direct CD/DVD/BD print function from a printer driver on macOS, and is carried out. A printer driver has to be CUPS. The direct CD/DVD/BD print function can't be called by AirPrint driver. When a driver to LAN access printer is installed, it's AirPrint by default, so it's requiring care. A driver to a USB connection printer was a CUPS driver by default.
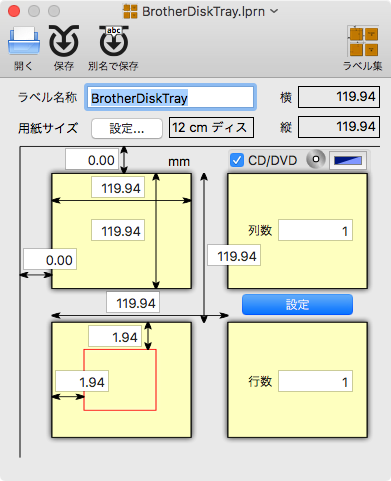
It clicks "Save As" from a tool bar, a file name is set up, and it once saves with the original setup.
A "Label name" is determined.
"Set" button of size is clicked.
If page setting dialog is displayed, "Applicable printer" is assumed to be Brother..., and "Size of the form" is assumed to be "12cm disk".
"OK" When the button is clicked, the size of the form is set to 119.94mm x 119.94mm.
Both "Columns" and "Rows" It is assumed 1.
A piece size is assumed to be 119.94mm x 119.94mm.
The size of the upper corner of the form is assumed to be 0.0mm.
The size of the blank in the left corner of the form is assumed to be 0.00mm.
The size in which a space each piece is added to a piece size is assumed to be same 119.94mm x 119.94mm as a piece size.
This comes to be displayed as a default value if it opens again after the set value is preserved though assumes the size of the blank in the corner in a piece to be 1.94mm x 1.94mm.
"CD/DVD" The check is put in the check box and it keeps effective.
"Set" button is clicked.
When printing, the price of the print dialogue "print setting" "the form kind" is "CD/DVD/BD Label", and when "form processing" "output paper size" is "recommendation form :12cm disk", a "print" button is clicked. The direct CD in this printer side of the body/DVD/BD print function is called. The warning panel to which I say "One for label print.... Do you print?" is indicated. "Application for label print....." it is not necessary to download it. "It's OK." a button is clicked and work is continued.
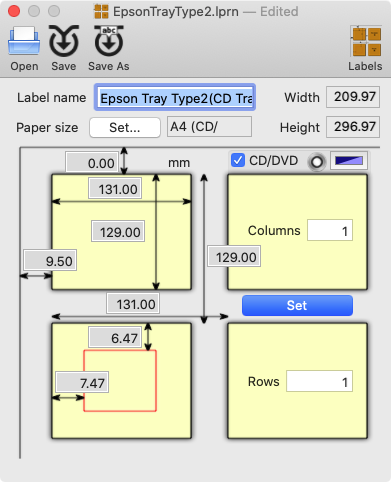
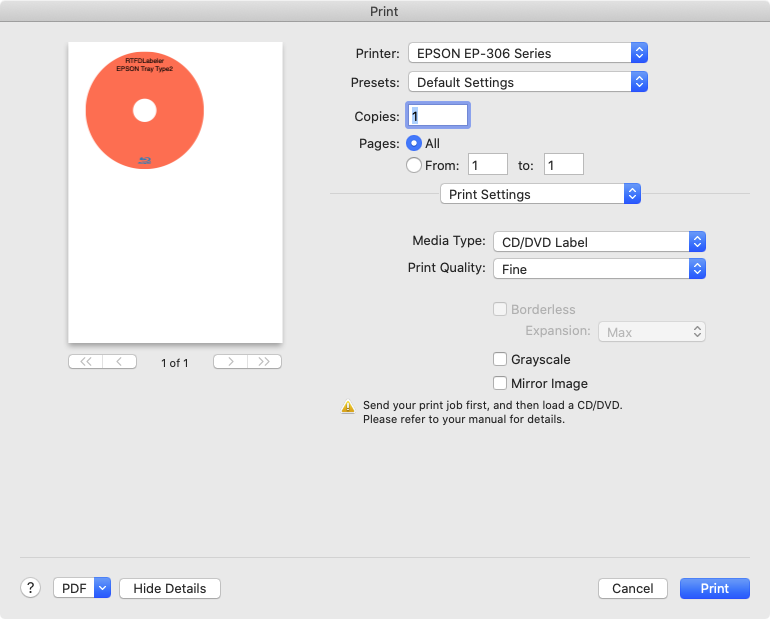
I take the case of EPSON Tray Type2 and explain.
It clicks "Save As" from a tool bar, a file name is set up, and it once saves with the original setup.
A "Label name" is determined.
A "Set..."button of the paper size is clicked.
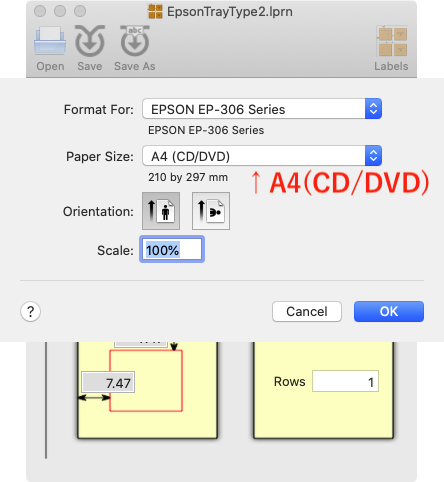
If the page setup dialogue is indicated, "Format For:" is established and "Paper size:" is made "A4▶︎ A4 (CD/DVD)".
Further "Paper size:" can be preserved as usual A4, so every time label shape filing is held, I have to set it as "A4▶︎ A4 (CD/DVD)".
Both "Columns" and "Rows" It is assumed 1.
A piece size is assumed to be 131.00mm x 129.00mm.
The size of the upper corner of the form is 0.00mm.
The size of the blank in the left corner of the form is assumed to be 9.50mm.
The size in which a space each piece is added to a piece size is assumed to be same 131.00mm x 129.00mm as a piece size.
This comes to be displayed as a default value if it opens again after the set value is preserved though assumes the size of the blank in the corner in a piece to be 7.47mm x 6.47mm.
"CD/DVD" The check is put in the check box and it keeps effective.
"Set" button is clicked.
When the price of the print dialogue "Print Settings" "Media Type:" is "CD/DVD Label" when printing, it'll be movement which corresponds to a label print on the printer side. It's different from a picture of a preview and the shape of the tray, but the location is adjusted on the printer side. When setting of "Paper Size" isn't A4 (CD/DVD), an error occurs on the printer side.
 LabelsForRTFDLabeler.zip